'37-'48 Chevy
|
(use the scroll bar on the right) |
Parts List
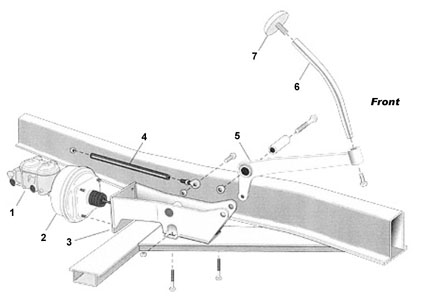
- Master Cylinder
- Power Booster
- Bracket
- Pushrod
- Lower Pedal Arm
- Upper Pedal Tube
- Brake Pedal Pad
|
|
- Remove the original master cylinder and brake pedal.
- Thoroughly clean the crossmember area where the bracket bolts onto (repaint if necessary).
- Assemble the master cylinder (1) and power booster (2) into the bracket (3).
- Install bracket (3) onto the crossmember where the original bracket used to be. Used the supplied bolts with the nuts on the top side.
- Install the lower pedal arm (5) to the bracket (3) with the supplied sleeve and bolt.
- Connect the pushrod (4) to the power booster (2) and lower pedal arm (5) with the supplied clevises.
- Install the upper pedal tube (6) into the lower pedal arm (5) with the tapered section on the bottom.
-
Adjust and rotate the upper pedal tube so it will pass
through the original hole in the floorboard. Tighten the 3/8" bolt on the
lower side of the tube to secure the pedal tube. Use Loctite on the
threads.
NOTE: The upper pedal tube may not line up with the original hole in the floorboard. To fix this, remove the lower pedal arm (5) and place in a vice. Heat the arm red hot and then bend it to fit.
- Adjust the pushrod so there is ½ “of play on the pedal pad (do not preload the master cylinder). There should very little clearance between the firewall and lower pedal arm when the brake pedal is released.
- Check for interference and binding throughout the pedal travel.
- Install the brake pedal pad (7) to the upper pedal tube (6).
- A new access hole on the floor needs to be cut out approximately 17" behind the original hole in the floor to allow access to the master cylinder.
- Reroute all brake lines into the new assembly, bleed the brakes, and connect manifold vacuum to power booster.